Product SiteDocumentation Site

Crosswalk 0.1

UKRISSCrosswalkTool

Crosswalk Connector User Documentation

Edition 0

Certus Technology Associates Ltd.

Abstract
Welcome to the home site of the UKRISS Crosswalk Connector Tool. This document describes how to install, implement and configure the connector tool for the Crosswalk project.
Crosswalk is available as a download from this site, and is freely available to the public under the GPL3 open source licence.

1. Overview
1.1. Project Background
1.2. PDI (Pentaho Kettle)
1.3. PDI Customisation
2. Installation
2.1. Overview
2.2. Installating PDI
2.3. Installing Crosswalk plugins
3. Configuration
3.1. Jobs and Transformations
3.2. PDI Repository
3.3. Steps and Hops
3.4. Previewing a Step
3.5. Executing a Transformation or Job
4. PDI Implementation
4.1. Parameterisation
4.2. CERIF-based Canonical Data Model Steps
4.2.1. Map to CDM
4.2.2. Get CDM fields
4.2.3. Convert CDM to CERIF
4.3. Command-Line Invocation
Index

Chapter 1. Overview

1.1. Project Background

A crosswalk tool, or connector, was required in order to demonstrate a proof of concept for the transfer of data from research institutions to funding bodies. The primary function of the tool developed is to collate information into a prescribed format and to transfer these data in a single transaction.
The tool had to be able to read from a number of divergent data sources, map them to a CERIF XML standard and transport them to a defined destination.
The tool has been tested on data provided by Exeter and partner institutions during the UKRISS project. It was not intended that the tool should be developed for production.

1.2. PDI (Pentaho Kettle)

The Pentaho Data Integration Community Edition (PDI CE), also known as Kettle, was successfully trialled in an earlier project (RMAS). It was therefore used as the basis of this part of the project. NB: For simplicity, the term PDI will be used throughout this document to refer to this software.
PDI uses the concept of Steps to represent actions performed on data, which can be arranged into transformations, allowing sequences of actions to be performed to manipulate data. Transformations can be performed in sequence in a job, meaning that modular approach can be taken to data manipulation, while maintaining the power of the actions can be performed.
A graphical interface allows the user to see how the data flows as it is handled with jobs and transformations.

1.3. PDI Customisation

To facilitate the use of PDI in the Crosswalk project, the concept of the CERIF-backed Canonical Data Model (CDM) is introduced. This is a model to which data can be mapped and passed between Transformations and can then be efficiently serialised into CERIF. Custom plug-ins have been developed for mapping data to the CDM and serialising the CDM to CERIF, and are provided with the release.

Chapter 2. Installation

2.1. Overview

This chapter details how to install Crosswalk on your system. There are two parts to the installation:
  1. Installation of PDI Kettle.
  2. Installation of plugins designed for Crosswalk.

2.2. Installating PDI

To install PDI, first visit the Pentaho Kettle website and download the software. NOTE: The plugins developed for Crosswalk have been tested against version 4.2.1 of Kettle. Certus Technology cannot guarantee the correct operation of these plugins on later versions of Kettle.
Follow the instructions on the Pentaho website to install the software.

2.3. Installing Crosswalk plugins

The Crosswalk plugins are available from GitHub. Search for the "crosswalk-connector-bin" project and download the directory. On examining the downloaded files, you will notice the directory pattern
kettle/plugins/steps
This mimics the directory structure of PDI Kettle; to install the plugins, simply copy the steps directory from the downloaded file location to the same location in the installation of Kettle you performed in step 2 of this chapter. On starting Kettle, the plugins will be available to use.

Chapter 3. Configuration

3.1. Jobs and Transformations

PDI allows creation of two file types: jobs and transformations. A transformation is used to describe the data flows for an Extract-Transform-Load (ETL) process, such as reading from a source, transforming data and loading it into a target location.
A job is used to coordinate ETL processes. A job might be used, for example, to wait for a file to be created in a directory, trigger an ETL process and finally send an email to communicate success or failure of the process. A job may utilise several transformations to achieve its goal.

3.2. PDI Repository

PDI uses a data repository to store jobs, transformations and metadata. The repository can be either a relational database or a folder on disk. To connect to a repository in PDI go to Tools->Repository->Connect... or alternatively press CTRL+R, then choose the repository you want to connect to. For more information on setting up a repository, please refer to the Installation section or the PDI documentation.

3.3. Steps and Hops

In PDI, transformations and jobs are made up of steps for performing various extract, transform and load operations. They are, in essence, the building blocks of the transformations and jobs. Steps are categorised based on their purpose; for example, there are input steps for reading in data, output steps for outputting data and transform steps for transforming and manipulating the data. See PDI Steps guide for a list of all of the available steps.
An example of a hop between two steps
Figure 3.1. An example of a hop between two steps

Hops are links between steps and describe the flow of the ETL process. You can create a hop between two steps by clicking the step you wish to start the hop from, press and holding shift, and draw a line to the corresponding step. By clicking the hop you can disable/enable it - disabled hops appear greyed out. Some hops are conditional and represent the flow of the ETL process under particular circumstances - for example when an error occurs. These hops are normally coloured, or have an icon over them to indicate their purpose.

3.4. Previewing a Step

Some PDI steps allow you to preview the data at that particular stage in the process. To do so, right-click on the step you want to preview and select Preview. A dialog will appear. Click Quick Launch and PDI will attempt to preview the data for you. Note that you can only preview steps within a Transformation, not entries within a Job.

3.5. Executing a Transformation or Job

Jobs and transformations can be executed within the Spoon interface by clicking the green run arrow shown in Figure 3.2, “Spoon run controls”.
Spoon run controls
Figure 3.2. Spoon run controls

This will bring up a window allowing you to configure the execution before it is run. Here you can override job parameters and set the level of logging to be displayed. Click Launch to then execute the job or transformation.

Chapter 4. PDI Implementation

4.1. Parameterisation

PDI uses parameters to allow the jobs and transformations to be configurable. Each transformation may specify its own parameters with default values, but these may be overridden by defaults specified at the job level. The job level defaults may in turn be overridden at runtime, for example with values specified on the command line.
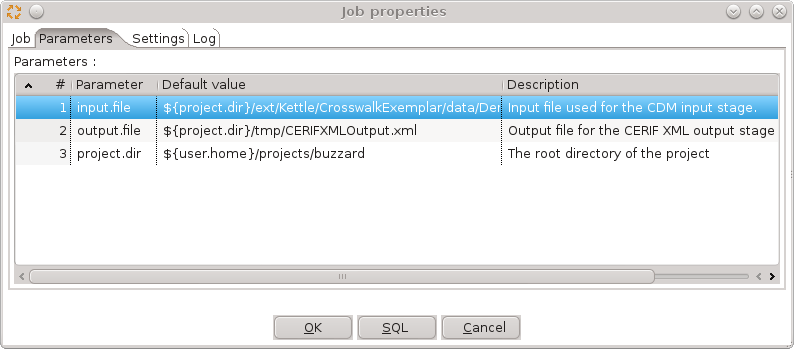
Parameters can be specified in Spoon using the properties editor for a job or transformation. While editing a transformation in Spoon, press CTRL+T and while editing a job press CTRL+J. Then in the dialog select the Parameters tab to access parameter configuration.
The parameters tab
Figure 4.1. The parameters tab

You will see a table showing the parameter name, default value and description. The default values specified in transformation parameter configuration can be overridden by specifying the same parameter at the job level. The parameters specified in the job are by default passed to the transformations which the job uses.

4.2. CERIF-based Canonical Data Model Steps

Crosswalk includes customised transformation steps for working with the CERIF-based Canonical Data Model (CDM). These extend the standard functionality provided by PDI.

4.2.1. Map to CDM

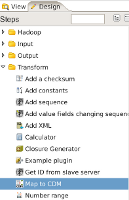
This step acts as a mapping step to map from a set of input fields to CDM fields. The step is accessed in the Design window by choosing Transform->Map to CDM.
The Map to CDM plugin
Figure 4.2. The Map to CDM plugin

This step can be configured to map from any input fields, but can only map to CDM fields. In the step properties there are three tabs: Select & Alter, Remove and Meta-data.
The Select & Alter tab allows for fields to be selected for inclusion, and renamed. The Get fields to select button on the right-hand-side of the window can be used to automatically determine the available fields from previous steps.
The Remove tab is used to remove fields from the stream. This is useful to prevent unwanted fields from an input source being mapped to CDM (for example if there is no appropriate field to map to), or to remove temporary calculation fields from earlier steps.
The Meta-data tab allows definition of the mappings from the input fields to the CDM Fields. Select an input field in the Fieldname column, and choose a CDM field to map to from the dropdown in the CDM Field column.

4.2.2. Get CDM fields

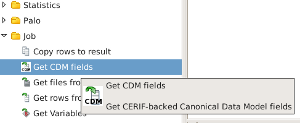
The Get CDM fields step is used to retrieve CDM fields made available by an earlier transformation in the same Job.
When it completes, a transformation may export rows of data to the job it executed within. In the worked examples it is typical to have an input transformation which, for example, queries a database. This will then perform any necessary data preparation and use the Map to CDM step to produce a stream containing only rows of CDM fields. The input transformation then ends with a Copy rows to result step to export these rows. If the transformation is run in a job, the rows may be picked up by any subsequent transformations by using the Get CDM fields step.
The Get CDM Fields plugin
Figure 4.3. The Get CDM fields plugin

This step cannot be configured and only imports CDM fields into the transformation.

4.2.3. Convert CDM to CERIF

Convert CDM to CERIF is used to convert all supported CDM fields to valid CERIF. The step is accessed in the Design window by choosing Output->Convert CDM to CERIF.
The Convert CDM to CERIF plugin
Figure 4.4. The Convert CDM to CERIF plugin

No configuration of this step is necessary and it will automatically serialise all supported CDM fields to valid CERIF XML. This step also performs validation of the resulting document against the CERIF schema. As a result, it is not possible that the resulting XML document contains invalid CERIF if this step completes without reporting any errors.

4.3. Command-Line Invocation

Jobs can be run in the Spoon graphical environment, but may also be run from the command line. PDI provides a command-line tool called Kitchen for this purpose.
Kitchen utilises the same repository configuration details as Spoon, so once a user has set up the Crosswalk repository in Spoon they may also run jobs from the command line without further configuration.
Kitchen is found in the root of the PDI installation; in Linux distributions it is located at
Crosswalk/kettle/kitchen.sh
or in Windows, at
Crosswalk\kettle\Kitchen.bat
The following command lines demonstrate how to execute an example Job on both Linux and Windows. These commands assume that the example job files are stored in their own subdirectory within the repository. Also note that the quote marks around the repository name are optional in this case, but they must be included if the repository name contains spaces.
Linux:
kitchen.sh -rep="Crosswalk" -dir=/ExampleJobDir/ -job=ExampleJob -param:input.file=/var/test/data.csv
Windows:
Kitchen.bat /rep:"Crosswalk" /dir:/ExampleJobDir /job:ExampleJob /param:input.file:c:\tmp\data.csv

Index